

今回はkaggleデータを取得して、機械学習の訓練用データと検証データを作成します。
▼ Contents
1. Streamlitとは
詳しくは、Streamlitで確認してみてください。
大まかな内容は
- PythonコードのみでWebアプリを作成できる
- HTML, CSS不要
- 公式ドキュメントが充実しているので実装しやすい
- Pythonコードで閉じるので、初心者でもわかりやすい
手頃にWebアプリを作成して、シェアしたいときなどには重宝しそうです。
それでは、実装していきましょう。
2. 環境構築(過去記事)
以下の本記事内容は、Docker環境で構築したAnacondaをベースに作成しています。予めご了承ください。
使用環境概要は以下となります。
- ホストOS: Windows10 Pro
- Docker image: ubuntu:18.04
- Anaconda: Anaconda3-2020.07-Linux-x86_64
- Python: Version 3.8.3 (64bit)
ファイルフォルダー構成は以下です。
.
|-- docker-compose.yml
`-- work
    |-- Dockerfile
    |-- requirements.txt
    `-- kaggle
        `-- taitanic
            |-- data
            |   |-- test.csv
            |   `-- train.csv
            `-- streamlit
                |-- main_streamlit.py
                |-- create_train_test.py
                |-- data_get.py
                `-- preprocessing.py
以下の本記事内容は、Docker環境で構築したAnacondaをベースに作成し、kaggleのタイタニックデータを使用しています。構築方法やデータ取得方法が不明な方は以下の記事をご参考ください。

3. 訓練データ作成に向けた処理コード
まずは、訓練データと検証データを作成するための”create_train_test.py”を作成していきます。
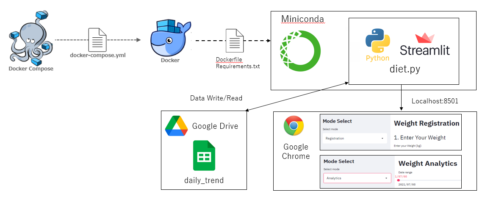
以下のコードの処理イメージを図1に示します。
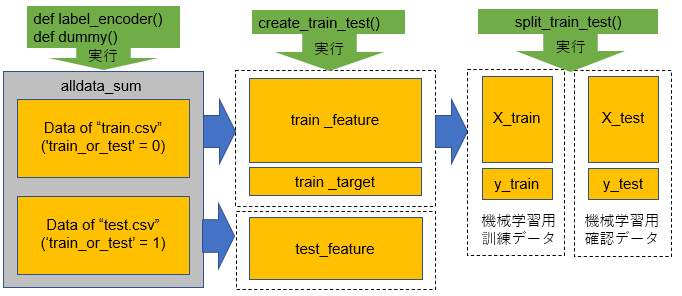
最初にカテゴリ特徴量をラベル化していきます。
""" create_train_test.py """
import pandas as pd
import numpy as np
from sklearn.preprocessing import LabelEncoder
from sklearn.model_selection import train_test_split

class Create_Train_Test():
    def label_encoder(self, alldata_sum):
        """ カテゴリ特徴量についてlabel encodingする """
        target_col = ['Sex', 'Fare_bin']
        label = LabelEncoder()
        for col in target_col:
            alldata_sum.loc[:, col] = label.fit_transform(alldata_sum[col])

        return alldata_sum
次にカテゴリカル変数に対して、ダミー変数(ある行に対し、その変数があれば1を付与, なければ0を付与する)を作成します。
    def dummy_df(self, alldata_sum):
        """ カテゴリカル変数をダミー変数にする """
        cat_col = ['Pclass', 'Embarked', 'Cabin_init', 'Fare_bin']
        alldata_sum['Pclass'] = alldata_sum['Pclass'].astype('str')
        alldata_sum = pd.get_dummies(alldata_sum, drop_first=True, columns=cat_col)
        return alldata_sum
ここまできたら、あとは不要なカラムを削除して、機械学習用の訓練データとテストデータを作成していきます。
    def create_train_test(self, alldata_sum):
        """ ターゲット変数と、学習に不要なカラムを削除する """
        target_col = 'Survived'
        drop_col = ['PassengerId','Survived', 'Name', 'Fare', 'Ticket', 'Cabin', 'train_or_test',  'Parch', 'FamilySize', 'SibSp']

        """ 最初に統合したtrain.csvデータとtest.csvデータを分離 """
        train = alldata_sum[alldata_sum['train_or_test'] == 0]
        test = alldata_sum[alldata_sum['train_or_test'] == 1]

        """ 学習に必要な特徴量のみを保持させる """
        train_feature = train.drop(columns=drop_col)
        test_feature = test.drop(columns=drop_col)
        train_tagert = train[target_col]

        print('The size of the train data:' + str(train_feature.shape))
        print('The size of the test data:' + str(test_feature.shape))

        print("Before ")
        print(alldata_sum.dtypes)
        print("After")
        print(train_feature.dtypes)

        return train_feature, train_tagert, test_feature
そして、機械学習用の訓練データを学習用の訓練データと、その精度を確認するための検証用データを作成します。
    def split_train_test(self, train_feature, train_tagert):
        test_size = 0.2
        """ trainデータをtest_sizeで分割する """
        X_train, X_test, y_train, y_test = train_test_split(
            train_feature, train_tagert, test_size=test_size, random_state=0, stratify=train_tagert)

        return X_train, X_test, y_train, y_test
これで、基本処理コードは完成です。
4. Streamlitを実装する
それでは、Streamlitを実装します。
今回は、訓練データに使用するカラムデータ種類表示機能と、訓練データと検証データの分割数の決定パラメータ機能、処理段階で訓練データや検証データに欠陥がある場合にアラームを出す機能を追加したいと思います。
以下のように”create_train_test.py”を以下のように変更します。
""" create_train_test.py """
import pandas as pd
import numpy as np
import streamlit as st
from sklearn.preprocessing import LabelEncoder
from sklearn.model_selection import train_test_split
class Create_Train_Test():
def create_train_test(self, alldata_sum):
target_col = 'Survived'
drop_col = ['PassengerId','Survived', 'Name', 'Fare', 'Ticket', 'Cabin', 'train_or_test', 'Parch', 'FamilySize', 'SibSp']
train = alldata_sum[alldata_sum['train_or_test'] == 0]
test = alldata_sum[alldata_sum['train_or_test'] == 1]
train_feature = train.drop(columns=drop_col)
test_feature = test.drop(columns=drop_col)
train_tagert = train[target_col]
st.write('The size of the train data:' + str(train_feature.shape))
st.write('The size of the test data:' + str(test_feature.shape))
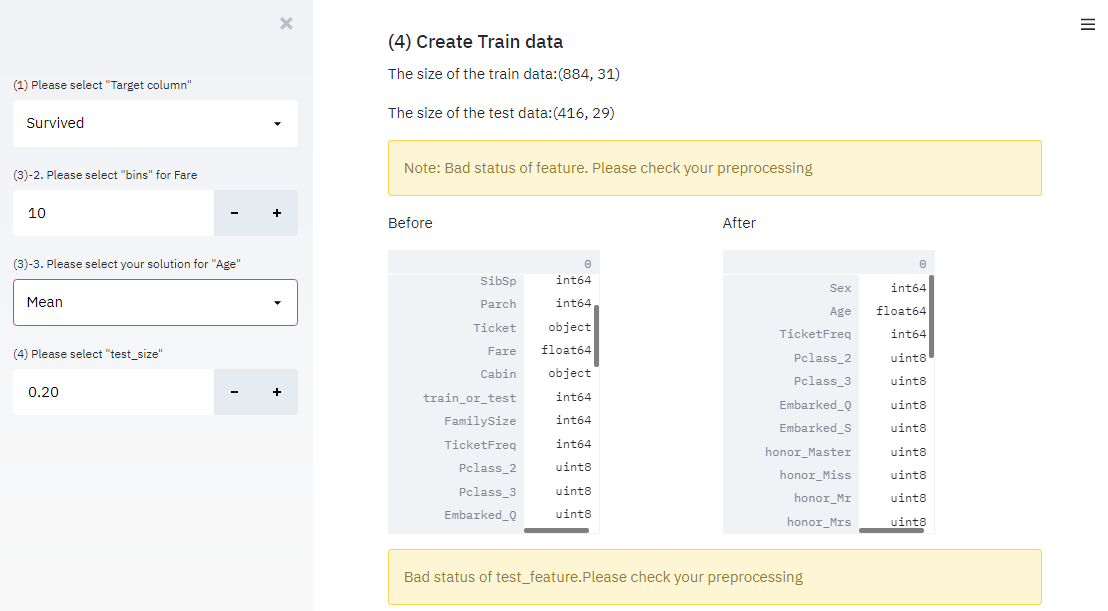
""" 訓練データと検証データのカラム数が違う場合にエラー表示する """
if train_feature.shape[1] != test_feature.shape[0]:
st.warning("Note: Bad status of feature. Please check your preprocessing")
with st.beta_container():
col1, col2 = st.beta_columns([1, 1])
with col1:
st.write("Before ")
st.write(alldata_sum.dtypes)
with col2:
st.write("After")
st.write(train_feature.dtypes)
return train_feature, train_tagert, test_feature特に以下のコードで訓練データと検証データのカラム数が違う場合にエラー表示するようにしておきます。この値が異なる場合、このあとの機械学習でエラーとなるためです。
""" 訓練データと検証データのカラム数が違う場合にエラー表示する """
if train_feature.shape[1] != test_feature.shape[0]:
    st.warning("Note: Bad status of feature. Please check your preprocessing")
続いて、訓練データと検証データの分割数をアプリ上で選択できるように、コードを追加しています。
    def split_train_test(self, train_feature, train_tagert):
        test_size = st.sidebar.number_input(
        '(4) Please select "test_size"',
        min_value=0.1,
        max_value=0.9,
        value=0.2
        )
        X_train, X_test, y_train, y_test = train_test_split(
            train_feature, train_tagert, test_size=test_size, random_state=0, stratify=train_tagert)
        return X_train, X_test, y_train, y_test
これで”create_train_test.py”の変更は完了です。
続いて、”main_streamlit.py”を以下のように記載します。
""" main_streamlit.py """
import pandas as pd
import streamlit as st
import data_get as dg
import preprocessing as pr
import create_train_test as ct
st.title('Titanic - Machine Learning from Disaster')
""" data_get.pyの関数を読み込む """
st.subheader('(1) Data Sturucture')
""" 記事その1をご参照ください。 """
dg_Inst = dg.Data_Get()
alldata, test_raw = dg_Inst.read_data()
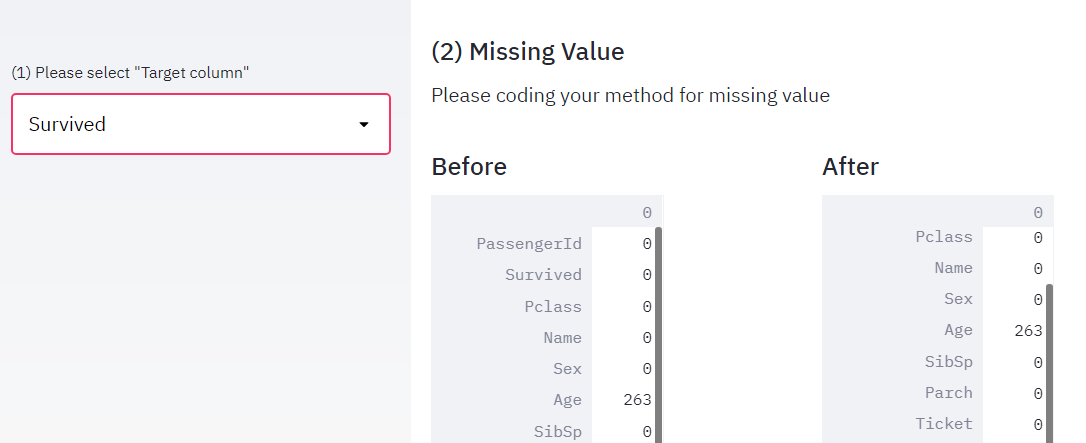
st.subheader('(2) Missing Value')
""" 記事その2をご参照ください。 """
st.write('Please coding your method for missing value')
alldata = dg_Inst.missing_value(alldata)
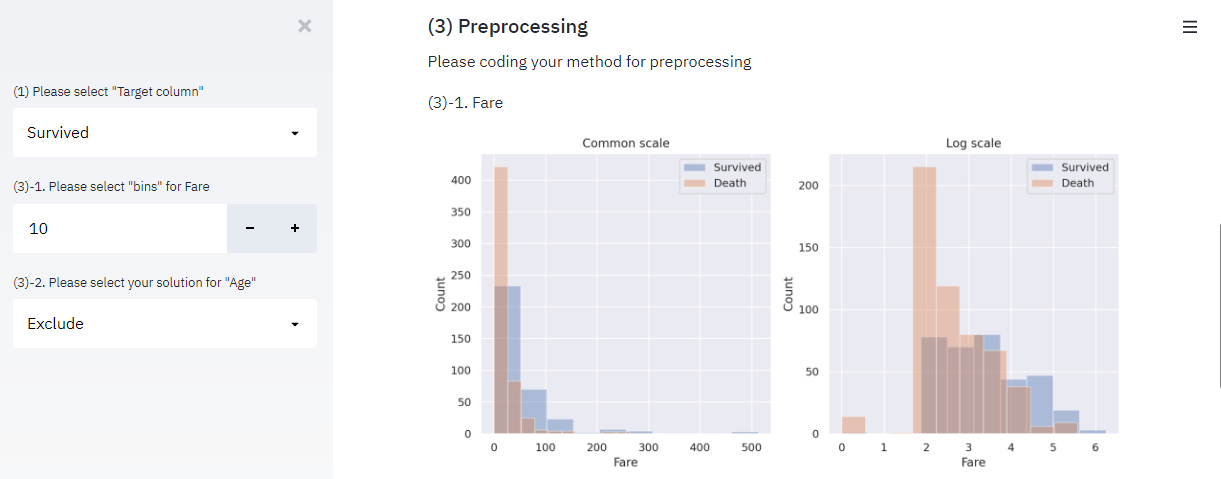
st.subheader('(3) Preprocessing')
st.write('Please coding your method for preprocessing')
alldata_sum = alldata.copy()
pp_Inst = pr.Preprocessing()
""" 記事その3をご参照ください。 """
st.subheader('(4) Create Train data')
ct_Inst = ct.Create_Train_Test()
alldata_sum = ct_Inst.label_encoder(alldata_sum)
alldata_sum = ct_Inst.dummy_df(alldata_sum)
train_feature, train_tagert, test_feature = ct_Inst.create_train_test(alldata_sum)
if test_raw.shape[0] != test_feature.shape[0]:
st.warning("Bad status of test_feature.Please check your preprocessing")
X_train, X_test, y_train, y_test = ct_Inst.split_train_test(train_feature, train_tagert)こちらも以下のコードで、予測用のテストデータと、処理後のテストデータの行数が異なる場合にエラーを出しておきます。
if test_raw.shape[0] != test_feature.shape[0]:
    st.warning("Bad status of test_feature.Please check your preprocessing")
このエラーが出る場合、処理中にテストデータの一部の行を削除している可能性があります。こちらもこのあとの機械学習でエラーになるので、ここでアラームを出しておきます。
main_streamlit.pyが書けましたら、以下のコマンドをターミナルで実行して、streamlitを起動しましょう。
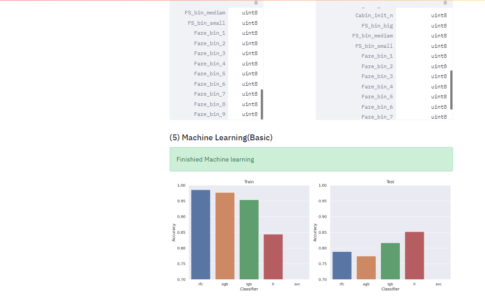
$ streamlit run main_streamlit.pyそうすると、通常通りであれば”localhost:8501″に以下のような画面が表示されると思います。
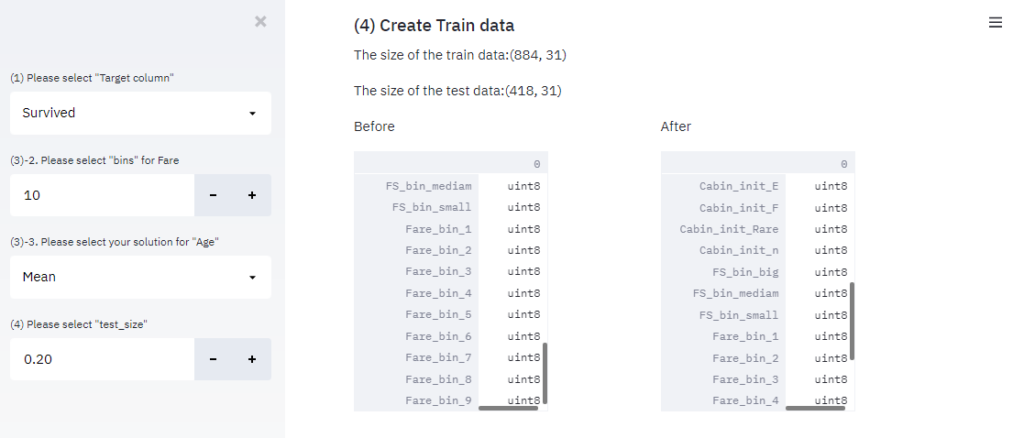
また、エラー発生時も表示されているか確認してみます。適当にエラーが出るように処理内容を変更すると、以下のようにアラームが表示されます。

エラー時もWebアプリ上で表示してくれるので、ミスを発見しやすいですね!
5. 完成コードとまとめ
本記事内の内容での完成形のコードを以下に示します。
""" main_streamlit.py """
import pandas as pd
import streamlit as st
import data_get as dg
import preprocessing as pr
import create_train_test as ct


st.title('Titanic - Machine Learning from Disaster')
st.subheader('(1) Data Sturucture')
""" 記事その1をご参照ください。 """
dg_Inst = dg.Data_Get()
alldata, test_raw = dg_Inst.read_data()

st.subheader('(2) Missing Value')
""" 記事その2をご参照ください。"""
st.write('Please coding your method for missing value')
alldata = dg_Inst.missing_value(alldata)

st.subheader('(3) Preprocessing')
st.write('Please coding your method for preprocessing')
alldata_sum = alldata.copy()
pp_Inst = pr.Preprocessing()
""" 記事その3をご参照ください。"""

st.subheader('(4) Create Train data')
ct_Inst = ct.Create_Train_Test()
alldata_sum = ct_Inst.label_encoder(alldata_sum)
alldata_sum = ct_Inst.dummy_df(alldata_sum)
train_feature, train_tagert, test_feature = ct_Inst.create_train_test(alldata_sum)
if test_raw.shape[0] != test_feature.shape[0]:
    st.warning("Bad status of test_feature.Please check your preprocessing")
X_train, X_test, y_train, y_test = ct_Inst.split_train_test(train_feature, train_tagert)
""" create_train_test.py """
import pandas as pd
import numpy as np
import streamlit as st
from sklearn.preprocessing import LabelEncoder
from sklearn.model_selection import train_test_split
class Create_Train_Test():
def label_encoder(self, alldata_sum):
target_col = ['Sex', 'Fare_bin']
label = LabelEncoder()
for col in target_col:
alldata_sum.loc[:, col] = label.fit_transform(alldata_sum[col])
return alldata_sum
def dummy_df(self, alldata_sum):
cat_col = ['Pclass', 'Embarked','honor','Cabin_init', 'FS_bin', 'Fare_bin']
alldata_sum['Pclass'] = alldata_sum['Pclass'].astype('str')
alldata_sum = pd.get_dummies(alldata_sum, drop_first=True, columns=cat_col)
return alldata_sum
def create_train_test(self, alldata_sum):
target_col = 'Survived'
drop_col = ['PassengerId','Survived', 'Name', 'Fare', 'Ticket', 'Cabin', 'train_or_test', 'Parch', 'FamilySize', 'SibSp']
train = alldata_sum[alldata_sum['train_or_test'] == 0]
test = alldata_sum[alldata_sum['train_or_test'] == 1]
train_feature = train.drop(columns=drop_col)
test_feature = test.drop(columns=drop_col)
train_tagert = train[target_col]
st.write('The size of the train data:' + str(train_feature.shape))
st.write('The size of the test data:' + str(test_feature.shape))
if train_feature.shape[1] != test_feature.shape[1]:
st.warning("Note: Bad status of feature. Please check your preprocessing")
with st.beta_container():
col1, col2 = st.beta_columns([1, 1])
with col1:
st.write("Before ")
st.write(alldata_sum.dtypes)
with col2:
st.write("After")
st.write(train_feature.dtypes)
return train_feature, train_tagert, test_feature
def split_train_test(self, train_feature, train_tagert):
test_size = st.sidebar.number_input(
'(4) Please select "test_size"',
min_value=0.1,
max_value=0.9,
value=0.2
)
X_train, X_test, y_train, y_test = train_test_split(
train_feature, train_tagert, test_size=test_size, random_state=0, stratify=train_tagert)
return X_train, X_test, y_train, y_test今回は、エラー表示付きのデータ処理前後の結果を簡単なパラメータ調整で表示させるWebアプリを作成してみました。
次回は、訓練データと、テストデータを用いて機械学習を実施して、予測結果を出力するWebアプリをStreamlitで実装してみたいと思います。
それではよいpython-streamlit ライフを!
以下、関連記事となります。合わせてお読みいただけるお幸いです。


コメントを残す